

how to add subtitles to imovie
Ever felt stuck and didn't know how to add subtitles to a video mac? Or are you curious about how you can add auto-generated subtitles to your movie using iMovie? Read on.
Suppose you are ever in need of subtitling a video on your Mac; either you want a subtitle in another language, for narration, or tutorial instructions. In that case, it could be done using iMovie. iMovie is an application program used to make simple video or movie editing on a Mac. Though iMovie does not yet have the option used for subtitling, you can still add subtitles to videos using the title option. It isn't exactly an easy tussle, but neither is it a laborious one.
Here is a comprehensive guide on how to go about the whole process, a guide on adding subtitles to a video permanently in iMovie.
How to add subtitles to videos using iMovie on Mac
Before going into how to add subtitles to a video permanently in iMovie, here are some questions addressed so you can fully understand how this process of creating subtitles works on iMovie.
Is it possible to add subtitles to videos using iMovie?
Definitely! Subtitles can be added to videos using the title tool. This process is a manual one, and it works this way; you add the individual block of texts into the iMovie timeline, edit it and tweak it to resemble the subtitle you want it to be.
You should note that the subtitles are open captions and would always appear on the video, which means they can't be turned off.
So how do you start?
Firstly, as it applies to every other thing, you have to open iMovie.
- Now that you are in the software, import the video you wish to subtitle.
- Select the clip in the movie or video you wish to add the subtitles to.
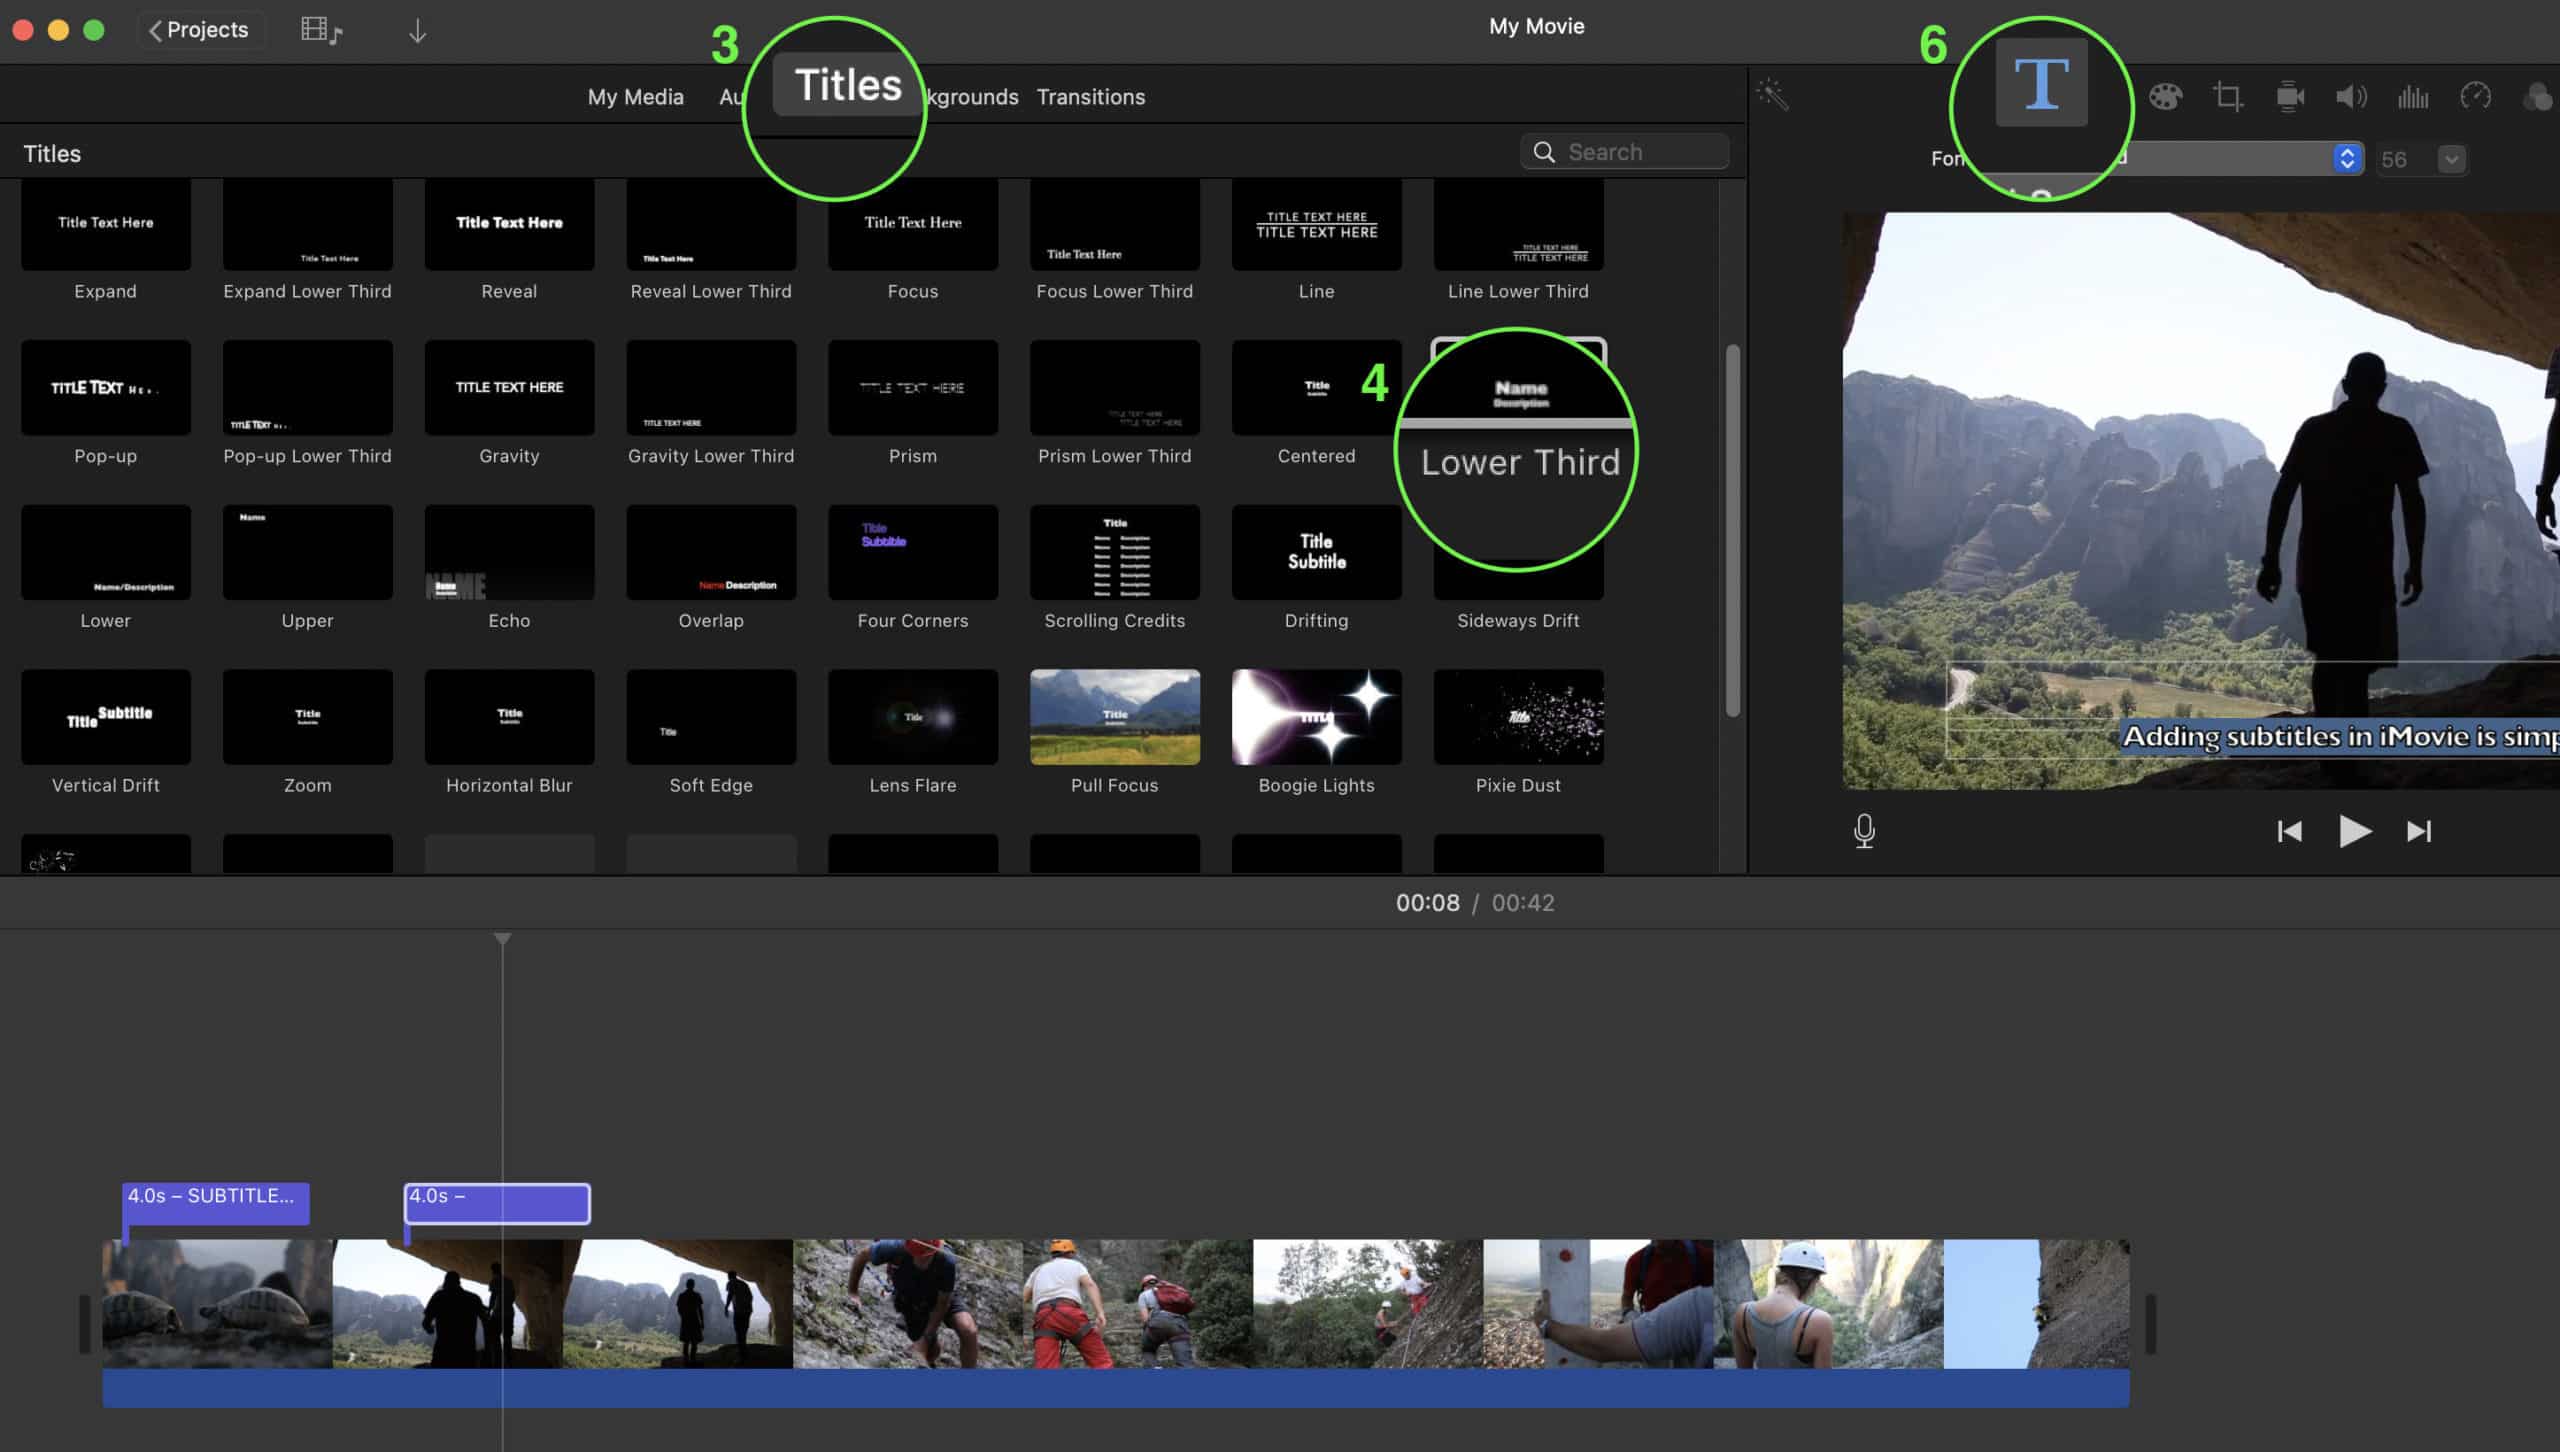
- Next, you will see a title sign on the viewer at the top. Click theTitle sign.
- After you have clicked the title sign, pick the title style you desire. Since you are looking towards having a subtitle, there are title options for the screen's bottom. They include lower, lower third, or reveal lower third. You can pick any of them.
NOTE:
If you want to see how the option would look on the video. You would drag the option unto the clip. For example, if you want a lower third, you will click the option and drag it left to right. The program will present a preview to you.
- Since your clip is selected on the timeline, you will double click the preferred title (subtitle) style to add it. However, you can do it alternatively by dragging the option chosen to your desired location on the clip.
- Now, it is time to add your text. To do this, go up to the viewer. At the top of the viewer, there is a text box and that is where you enter your text.
How do you do subtitles edit and adjust captions?
After you have used a title as the caption or subtitle, you might want to adjust the duration. Also, you might also want to add more captions and subtitles to a single video or movie clip. For example, if you have a one-minute video clip and want to add about seven subtitles within that one minute, you can do that.
Firstly, here is how you can adjust the duration. If you want to either extend or shorten how the text (subtitle) would appear on the screen, all you have to do is select the subtitle in the timeline and do any of the following:
- Drag any of the edges
To lengthen or shorten the duration, drag one of the edges. As you do this, the duration will start to change. - Click theClip information
The clip information is an "i" icon above the viewer. When you have clicked this, you can enter the number of seconds you want the duration to be.

How to change the text style?
With iMovie, you can also change the text style, which is part of the subtitle edit. The color, font, style, and even alignment of your auto-generated subtitle. All you need to do is click the title clip in your timeline and click the title setting icon at the top of your viewer.
After you have done that, all the options you can click on to adjust the title bar on your viewer will appear, and then you can pick the one you want.
How do you trim and align your subtitle (title) to the audio's dialogue?
After you have inputted the title using all the tips above, flow is also an important aspect to consider. You will have to listen to the dialogue so as to type the corresponding text in each segment of the video. This is done rather simply. All you have to do is drag and drop the subtitle (title) to the frame that starts the dialogue you are working on. Next, you trim this title to come into incongruity with the end of the dialogue.
If the sound isn't dialogue but is somehow meaningful to the video, you can put it in brackets within the subtitle.
In order to start your next clip, all you have to do is copy and paste your current subtitle to the new clip to start. This would help you retain the text style and save you the stress of having to start editing every time you begin a new clip.
Moving on, to prevent subtitles from staying on top of each other, you will see a play head. Move the play head to the part in the timeline where the title doesn't exist.
After you have typed in all the subtitles and edited the fonts, style, and everything aligns with what you propose your subtitle to be, you can now share the file you have made. You can decide to send it as a file or send it into the iMovie theatre, Facebook, Vimeo, iTunes, or YouTube. There is a small share icon at the top right corner of the app. Click on it, then share the file.
The good thing is iMovie does not need or require any special setting for you to be able to export your videos with the open subtitles you have set since as a matter of fact, they are titles rendered onto the video.
Note, however, for the best experience, export at the best resolution, quality, and compression.
After you export the file, open it. Now, you would be able to see all your captions during playbacks.
How to add subtitles in iMovie using an SRT file
Though you can use open captioning to make subtitles(titles) in iMovie as explained above, you can do the same with SRT files, and in fact, it proves to be a more time-efficient alternative.
Nevertheless, you would have to get an SRT file for your video before you can do this.
How to get SRT files?
There are several ways you can get SRT files, from using a manual process, hiring a freelancer, to using software. However, over the years, a means has proved more effective in the regard of creating subtitles (.srt file), and the means is using Amberscript.
Amberscript is a reliable AI-based transcription service and tool that creates subtitle files using the audio transcription. It also possesses the automatic subtitle generator that helps it get the best subtitle files you want in the quickest time possible. So here is how you get your SRT files using Amberscript.
- To get SRT files, the very first step is to visit the site. Then you upload the video you wish to transcribe.
- After you have uploaded the video, Amberscript starts to transcribe your video. With the help of their automatic subtitle generator, this process doesn't take long, and within minutes you would get your draft.Then you will be able to download the first draft which has gone through its online text generator.
- You can edit the first draft of your subtitle on their online text editor to suit anything you want. The editing includes things like correcting grammar structures like punctuations. As a plus, you even get the chance to annotate and highlight parts of the text (subtitle edit).
- Afterward, if you are happy with the edited subtitles, you can download them.
Additionally, you can export the subtitle in any format you want. Since you want your subtitle in the SRT file format, you pick that with optional timestamps or annotation.
WHY AMBERSCRIPT?
- Its automatic speech alignment and recognition save up several hours of your subtitling time.
- It is inexpensive while still having the fastest turnaround time.
- Amberscript also produces the best accuracy.
Start creating automatic subtitles with Amberscript!
Can you add SRT files to Videos on iMovie?
Squarely, No. You can't import SRT files directly in iMovie.
However, you can copy the text from the SRT file and paste it—which is way faster than having to type directly into the text box.
NOTE:
You can also get your SRT file from iMovie as well. After open captioning, you can request the subtitle file. This is how it is done:
- Firstly, export a QuickTime file of your project into a video file on your computer.
- Next, order caption files along with your export.
Tersely, all of what is above is how to add subtitles in iMovie. It is now clear that the processes needed to add subtitles to iMovie videos aren't as easy. There are a lot of efforts that come with it. However, the conscious effort and the time used make nice subtitles that flow well with the audio of your video and look good on the video. iMovie is not particular about subtitling. However, it is done quite nicely using the title feature than any other platform on the Mac.
Hopefully down the road, Apple will bring in a better option to make subtitling way easier than this. But for now, using the title feature works and works fine. Not to forget, when partnered with Amberscript, it works best. Check them out if you need help creating subtitles.
how to add subtitles to imovie
Source: https://www.amberscript.com/en/blog/how-to-add-subtitles-imovie/
Posted by: beckexes1949.blogspot.com
0 Response to "how to add subtitles to imovie"
Post a Comment